快速开始
LangGraph 是一个用于构建可控代理的低级编排框架。Langchain 提供集成和可组合组件来简化 LLM 应用程序开发,而 LangGraph 库则支持代理编排,提供可定制的架构、长期记忆和人工介入等功能,以可靠地处理复杂任务。
兼容说明
- 如果您使用 Python 开发自己的 AI 应用,可以继续阅读本文。
- Lighthouse 完全兼容 LangGraph SDK,您可以使用 LangGraph Python SDK 来采集 LLM 应用的可观测性数据。
安装依赖项
前置条件
确保您的环境满足以下要求:
- Python 3.7 或更高版本
- 已创建 Lighthouse LLM 应用
- 已获取应用的密钥和公钥
pip install -U langgraph
创建 API 密钥
要创建 API 密钥,请前往 Lighthouse 「LLM 应用/应用分析/新建 LLM 应用」 页面,然后单击「新建 API Key」(创建 API 密钥)。
设置您的环境
export LANGSMITH_TRACING=true
export LANGSMITH_ENDPOINT="<your-lighthouse-endpoint>"
export LANGSMITH_API_KEY="<your-lighthouse-api-key>"
export LANGSMITH_PROJECT="<your-lighthouse-project>"

# This example uses OpenAI, but you can use any LLM provider of choice
export OPENAI_API_URL="<your-openai-api>"
export OPENAI_API_KEY="<your-openai-api-key>"
配置建议
推荐使用环境变量方式进行配置,这样可以更好地管理敏感信息。
跟踪 LLM 应用程序
import os
from typing import Literal
from langchain_openai import ChatOpenAI
from langchain_core.tools import tool
from langgraph.checkpoint.memory import MemorySaver
from langgraph.graph import END, START, StateGraph, MessagesState
from langgraph.prebuilt import ToolNode


# Define the tools for the agent to use
@tool
def search(query: str):
    """Call to surf the web."""
    # This is a placeholder, but don't tell the LLM that...
    if "sf" in query.lower() or "san francisco" in query.lower():
        return "It's 60 degrees and foggy."
    return "It's 90 degrees and sunny."


tools = [search]

tool_node = ToolNode(tools)

model = ChatOpenAI(
    base_url=os.environ["OPENAI_API_URL"],
    api_key=os.environ["OPENAI_API_KEY"],
    model="glm-4-flash", temperature=0).bind_tools(tools)

# Define the function that determines whether to continue or not
def should_continue(state: MessagesState) -> Literal["tools", END]:
    messages = state['messages']
    last_message = messages[-1]
    # If the LLM makes a tool call, then we route to the "tools" node
    if last_message.tool_calls:
        return "tools"
    # Otherwise, we stop (reply to the user)
    return END


# Define the function that calls the model
def call_model(state: MessagesState):
    messages = state['messages']
    response = model.invoke(messages)
    # We return a list, because this will get added to the existing list
    return {"messages": [response]}


# Define a new graph
workflow = StateGraph(MessagesState)

# Define the two nodes we will cycle between
workflow.add_node("agent", call_model)
workflow.add_node("tools", tool_node)

# Set the entrypoint as `agent`
# This means that this node is the first one called
workflow.add_edge(START, "agent")

# We now add a conditional edge
workflow.add_conditional_edges(
    # First, we define the start node. We use `agent`.
    # This means these are the edges taken after the `agent` node is called.
    "agent",
    # Next, we pass in the function that will determine which node is called next.
    should_continue,
)

# We now add a normal edge from `tools` to `agent`.
# This means that after `tools` is called, `agent` node is called next.
workflow.add_edge("tools", 'agent')

# Initialize memory to persist state between graph runs
checkpointer = MemorySaver()

# Finally, we compile it!
# This compiles it into a LangChain Runnable,
# meaning you can use it as you would any other runnable.
# Note that we're (optionally) passing the memory when compiling the graph
app = workflow.compile(checkpointer=checkpointer)

# Use the agent
final_state = app.invoke(
    {"messages": [{"role": "user", "content": "what is the weather in sf"}]},
    config={"configurable": {"thread_id": 142}}
)
final_state["messages"][-1].content
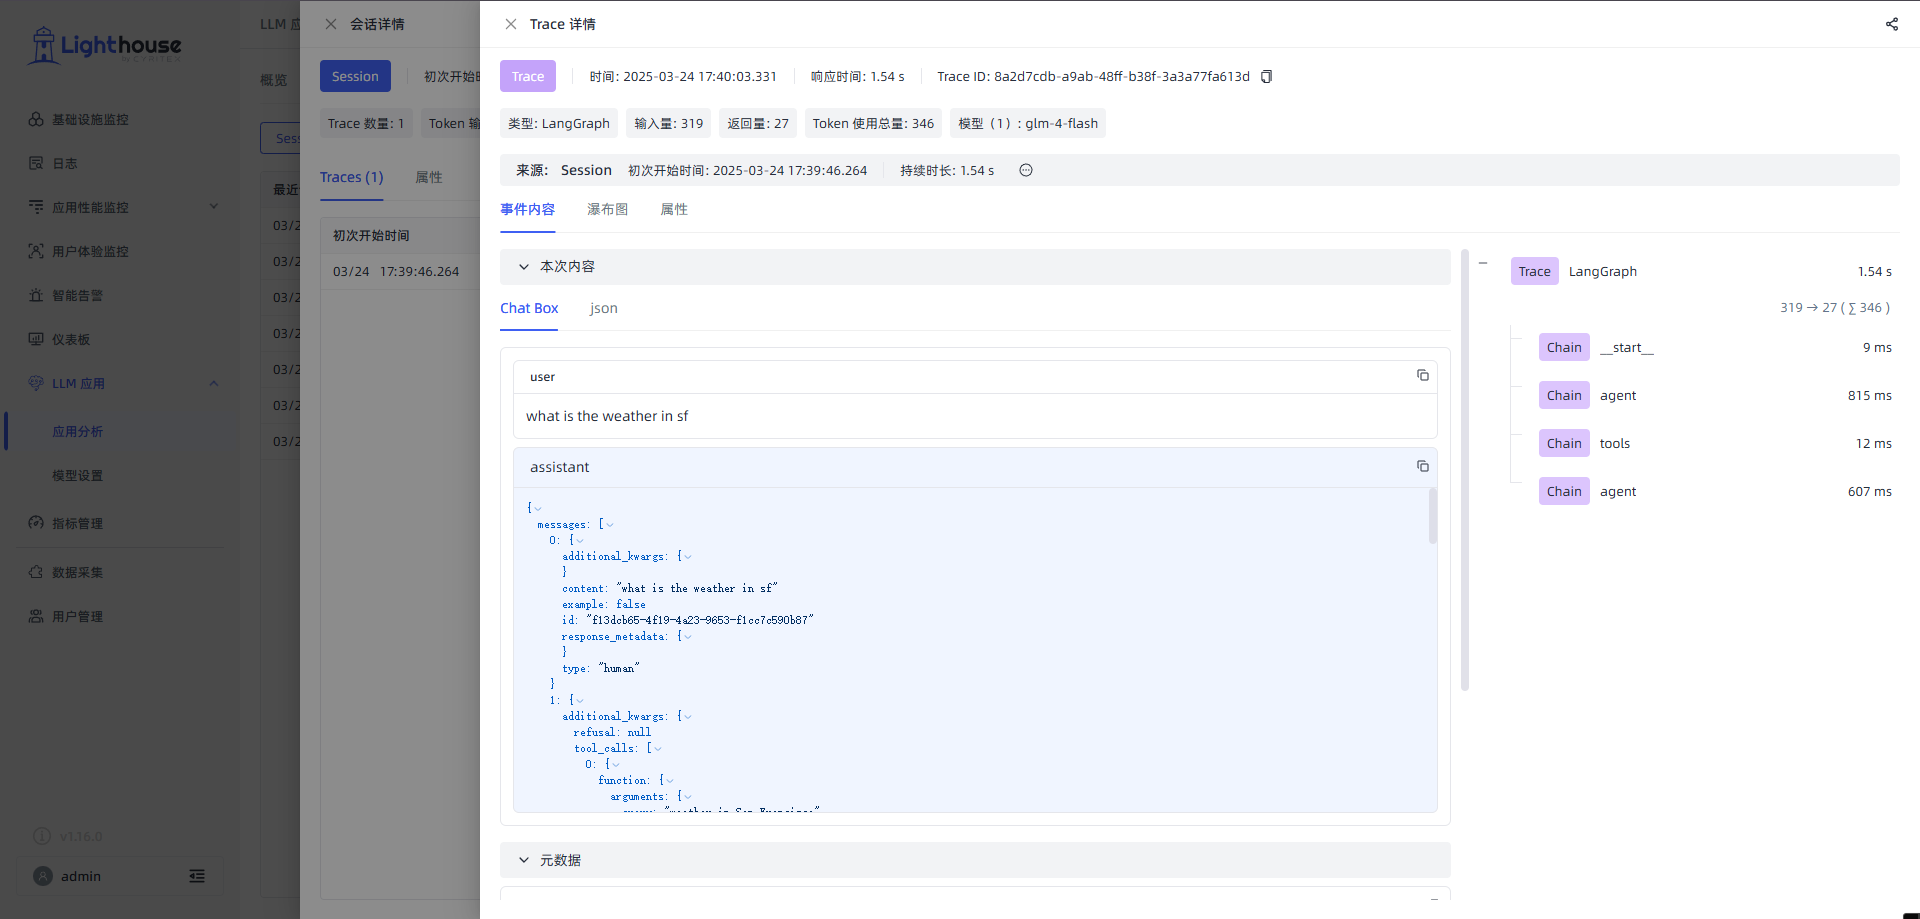
查看跟踪记录
执行后将在 Lighthouse 项目中生成如下的跟踪树结构: